I just got a blog award from makingjewellerysupplies.com
So thank you, to them!! :-)

onsdag den 29. september 2010
søndag den 26. september 2010
Recycling
We are doing a blog carnival on the always wonderful SATEAM. This means that we are all writing about the same topic, and this month the topic is; RECYCLING
Great theme for me as I do have some fun recycling projects to show you.
 |
| Soda can before |
I had this idea, that I wanted recycle soda cans, and use them in my jewelry. The idea sprung from a friend who just can't live without her daily doses of coca cola, and as a fun present I wanted to make her coke earrings :-)
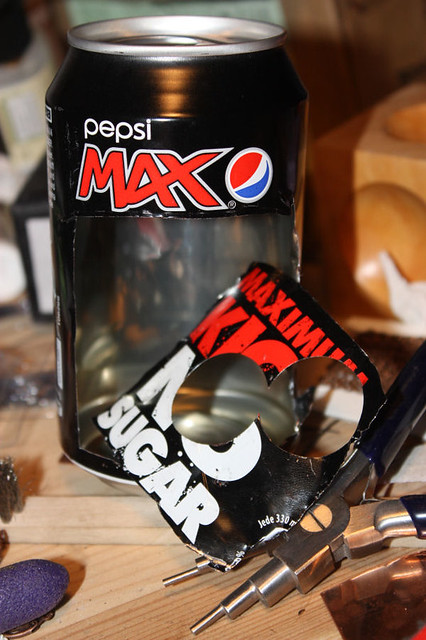 |
| Cut out soda can earrings |
So I cleaned out the cans and cut out circle discs, with my disc cutter. Afterwards I filed the edges so they wouldn't be sharp.
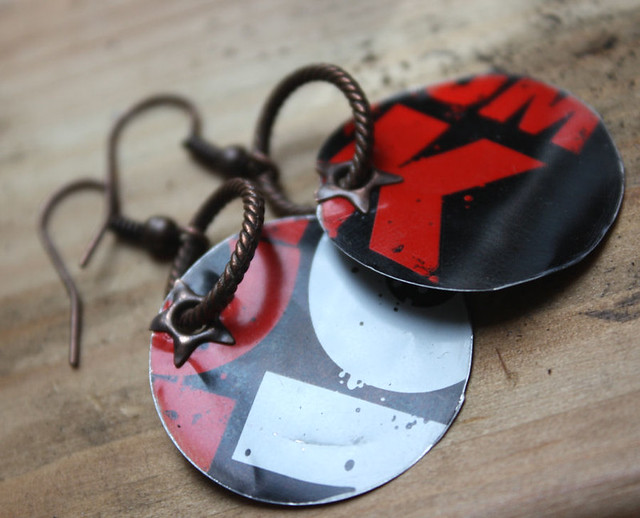 |
| Finished earrings |
Then I punched holes in the circles, and used little star rivets to cover the holes. I haven't gotten around to make any more, but the plan is to have some available in my shop soon, so keep an eye out.

Another recycling project is my steampunk pieces. I use old watch parts, buttons, nails and whatever fun thing I come across.
 | ||
| Christmas present for my Mum last year |
 |
| Birthday present for my Mum |
My mum love steampunk, so most of my steampunk pieces she ends up getting before they make the web shop, but I do make these as custom orders as well.
So that was a little bit about how I like to use recycling products in my jewelry making!
Follow the links to the blogs of this month's participating members to find out how recycled materials play into their work.
Bead Sire
The FamiLee Jewels
Bead Sire
The FamiLee Jewels
fredag den 24. september 2010
Denmark - My Country
This is a more personal post, as I wanted to tell you all a little bit about my country, Denmark. We are mostly known for the writer HC Andersen, the little mermaid and our capital city Copenhagen. But I live on an island called Als, in the southern part of Denmark, almost at the border to Germany. We are a constitutional monarchy, meaning we have a Queen or sometimes a King, that is the head of our country, but she/he does not have any powers politically. So if you saw "The prince and me" you might have gotten the wrong idea about how our country works. We have a premier minister, and he's selected at elections just like the American president. So Denmark is a democracy. (Hated that movie by the way, NOTHING was right about how Denmark was displayed.)
 |
| Local beach, where we sometimes go to eat breakfast outdoors. |
The nature around Denmark is very beautiful. The weather is mild with snow in winter, sunny in the summer and rainy in the fall. We don't have any dangerous animals, no volcanoes, earth quakes or tsunamis. In general we are pretty well of.
 |
| Picture from local forest, where I walk my dog. |
We are a Lutheran Christian country, but the general public doesn't go to church except for holidays, weddings and christenings. In the olden days we believed in the Norse mythologies, and we still feel very connected with the old tales of Thor, Odin and Freja. I am often inspired by Norse mythology in my jewelry making. As for my own believes, I am like most of the general Danish population. I was married in a church, but I don't tend church on a regular basis. I like the ideas behind Christianity, but I wouldn't say I'm a firm believer in god, we are just not brought up to it here in Denmark.
 |
| Me and my husband at our wedding |
This is not a regular Danish wedding dress. We decided to make our wedding themed, as a fairytale wedding. So all of our guest has to come dressed up as a fairytale character. Normal wedding dresses in Denmark are white and our customs are very similar to the Americans.
 |
| Just a wood log I saw on my trip around the forest. |
We are a very small country with only about 5.5 million citizens in total. In comparison, New York City is about three times as big, as the whole Kingdom of Denmark. So you could pretty much drive from one end to the other in about 10 hours.
 |
| Me and my dog. He's named after the Norse Mythology god Balder, known for his beauty. |
| Well I guess I could tell you a lot more, but this was just a small introduction to where I'm from. |
onsdag den 22. september 2010
Where To Buy Materials?
I always gets asked where I buy my supplies for jewelry making. I know some jewelry artist wont give out their supply source, since then everyone will start to copy them. I however make all the parts for my jewelry myself, and don't feel threaten by competition. Instead I see it like this; If I have a great supply store, I would want him/her to do good, so that the shop keeps existing. Also if a supplier has given me a great service, why not tell people about it, and give him/her the possibility to make more sales? Also I see my fellow jewelry artists as colleagues, not as competition I need to beat. So with no further ado, here's a list of my favourite supply shops!
Wire I buy pre-oxidized. I do this, because some stones don't take well to the chemicals used in oxidation. Also my supplier uses the chemicals much more productive, then I can at home, therefore less chemicals gets wasted, and that is better for the environment. So my sire I purchase from JustWire on Etsy.

Dave that runs the shop is very nice, and always gives a perfect costumer service. If you need a special order, he's always fast to respond and ships your order very fast. He's also one of the only suppliers I have found that carriages copper bezel wire.
Beads I tend to buy on Ebay. Over the years I've purchased beads from lots of different Ebay shops. Some people are scared of buying beads on Ebay, because they worry about the quality. I have never had any problems, and most sellers on Ebay are very nice and service minded. Here's some of my favourites.
Big beads I normally purchase from KylinMore on Ebay,He has a huge selection of beads in all sizes, but I find that his selection of nugget beads and small crystal rondelles are the best. You can both bid and "buy it now" on all of his beads. He has a great discount on shipping if you buy multiple items, so I always try to summon up a big order before submitting my order.
 | ||
| The nuggets pictured here, are the amethyst nuggets I use in my "Nugget Bead Framing Tutorial". |
 | |||||||
| Buy tutorial here! |
Tiny briolettes are always hard to find, especially if you want them to be natural stone. But Vannesspan on Ebay, has some great ones, in really good quality and at fair prices.
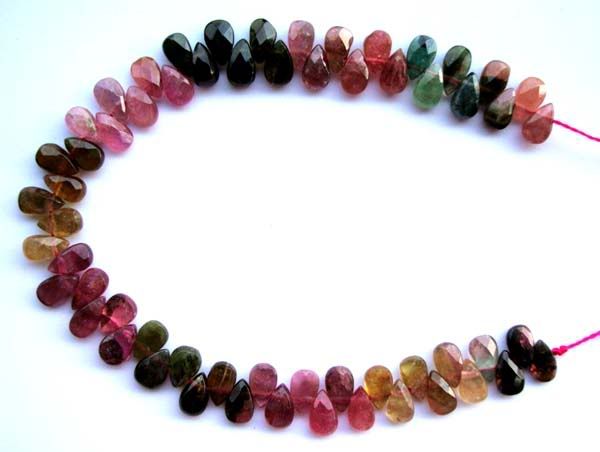
The beads come packed in very nice foam boxes. Very very safe packaging. And costumer service is really great at this shop!
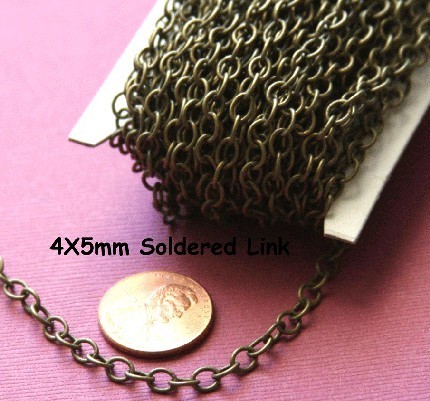
Findings such as chain, O'rings and pins, I buy at YadanaBeads on Ebay. I find the quality is great, shipping fast and prices fair. They also have a huge selection and great multiple shipping discounts.

So these are my best shopping tips so far :-) I will do another post soon on where to buy the best tools.
søndag den 19. september 2010
Top 5 - Favourit jewelry making books
I own an insane amount of jewelry making books. And then I thought, why not share my absolute favourite top 5, with you... I will start with number 5, and end with my all time favourite :-)
5. The Art of Polymer Clay Millefiori Techniques by Donna Kato
Techniques: Polymer clay bead making
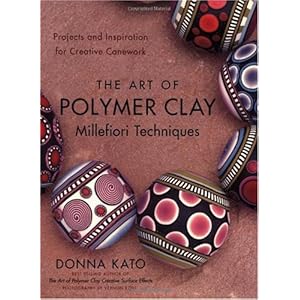
The best polymer clay book ever written in my opinion. This is one thick book, and it goes through everything you need to know about polymer clay. Very well written instructions plus a pretty long introduction to the history behind polymer clay. A most have book for anyone making polymer clay.
4. Silver Threads by Jeanne Rhodes-Moen
Techniques: Soldering - Filigree
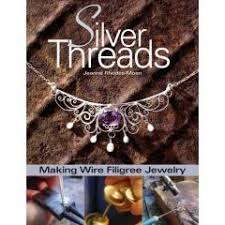
This is actually the book that got me started making jewelry. I did it all backwards and started soldering, before I even knew what a head pin was. Jeanne's book really makes it easy to begin soldering, and starts with easy projects and end up with very detailed intermediate pieces. All pieces are filigree styled and simply just gorgeous. A great book for everyone intrested in learning how to solder.
3. Steampunk Style Jewelry by Jean Campbell
Techniques: Cold connections

This is a selection of the very best steampunk artist. Great fun projects are shown with pictures. But what is even better, is that all through the book are small chapters on the origin of steampunk. So not only do you learn how to make jewelry, but you also get some steampunk history. And to top it of, it's all done with great pictures and a nice layout.
2. Stamped Metal Jewelry by Lisa Niven Kelly
Techniques: Letter and design stamping on metal sheet

Very clear pictured instructions and a wonderful fun and joyful layout. Not only do you get the book, but with it is a DVD, where Lisa shows the techniques in several videos. This is one of my most recent purchases and I couldn't be happier.
1.Enchanted Adornments by Cynthia Thornton
Techniques: Metal clay, polymer clay, wire wrapping, shrink plastic, mixed media and resin

This is my all time favourite jewelry making book. Cynthia has a story to all the pieces in the book, I wont reveal too much but I promise it's very magical and fairytale like. Plus the main character is a jewelry designer (Can it be more relatable??) Techniques are only written, but this book introduces you to a lot of different techniques, and me being a technique junky, this is perfect. So this is jewelry making combined with a fairytale short story. And all the pieces are simply gorgeous. I see it as an introduction to a lot of different techniques, you will need more info on the techniques, but this is a great way of finding out what you want to try next. Best buy I ever made.
lørdag den 18. september 2010
Taking Jewelry Photos - How to choose the background
In most photo lessons, on how to take good pictures of your jewelry, you are almost always told to use a simple, one colour background, in order to not distract the eye from your jewelry. It's not that I disagree with this, but I do think you are in danger of making your web shop look a little bit boring. I always admired the shops, who has busy backgrounds, but still make it work. I've never really figured out how to use props in a good way, though I know some shops do this very successfully. However, I do believe I've figured out some good points on how to use patterned backgrounds. And now I will try to give these points to you :-)

I always use craft paper for my backgrounds. I tend to look for papers which doesn't have any contrasting colours, and where the pattern isn't too obvious. I've often fallen for very advanced papers, which has lots of gorgeous detailing, but the simple patterns does work better. I buy the craft papers at stores that carriages supplies for scrap booking. They often have a huge selection of gorgeous papers. Also always choose papers which has a mat finish. You don't want the paper to shine back at the camera.


I always use natural lighting in my photos. I know you can buy expensive light boxes, but I really don't like the unnatural results they give. I want my pictures to be as true to the real life experience as possible. In the picture above, you can see how I place my piece on top of the craft paper, as close to the window as possible. Really not a very fancy set-up, but I find that it works.

Having a good camera is very important, but always remember to use the macro setting on your camera. Normally it's pictured as a flower. This will set the focus on detailing, and that is just what where looking for, when taking photos of jewelry.
 |
| The picture I choose for the web shop - a good all year around background |
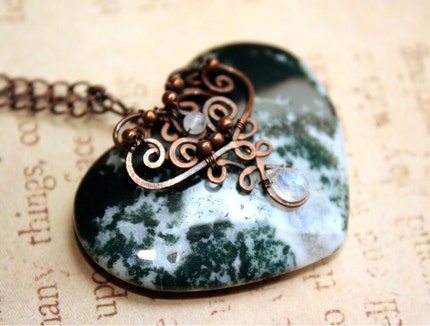
Next step is to choose the right background for the right piece of jewelry. I try to consider what I want my message to be. Is the piece a seasonal piece? Do I have a certain story I want the piece to express? Do I want to put emphasize on the colour of the piece? Or do I want to tone down the colour of piece?
My inspiration behind the green heart above was this: New fallen snow on moss, glitters with the sparkles of fairy dust. Small snow flakes are encapsulated to this beautiful moss agate, and lets you feel the fresh air, when the first snow has fallen, all year round.
Now this piece really calls out for being seasonal - more particularly a Christmas piece. But I made the piece in July, not the right season for marketing a Christmas piece. Here's different ideas for using the background of the picture, to change the season of the piece.
 |
| Autumn focusing on the brown colours. |
For autumn I could use this brown background with leaves. This put emphasize on the brown colour of the metal, and makes you think of fallen leaves.
 |
| Spring/summer emphasize on romance |
For spring or summer I would probably choose a light and romantic background. Preferably one that put emphasizes on the heart shape and romantic swirls decorating the pendant.
 |
| Christmas seasonal background |
And to really make the piece stand out as a Christmas seasonal piece, I would choose a Christmas background like this one. If you want to use a background with clear patterns, choose one where the pattern is big, then it wont be as busy.
 |
| Emphasize on colour |
To put emphasize on colour, I would choose a background with the same colour that I want to emphasize. This will make the heart look more green, then it really is.
And to do the final touch it's not enough to just post your pictures as they came out to be. All photos no matter how good, should undergo a little photo editing, to make it look more professional. I want go into all the details on how to use photo editing here, but just show you a before and after picture.
 |
| Before photo editing |
 |
| After photo editing |
søndag den 12. september 2010
Treasury - Falling for Fall

lørdag den 11. september 2010
Inspirational artist - Earthfire Studios
Earthfire studios is a wonderful steampunk jewelry shop on Etsy. I am very fascinated by steampunk, the fact that you can get something completely new and different out of old metal scraps and findings. That's why Earthfire studios is this weeks inspirational artist.
 |
| Silver Leaf Torch Soldered Vintage Watch Cuff |
Earthfire studios jewelry is all created with vintage gears and findings and all jewelry is shipped in recycled gift boxes. So if you want to take care of our invorement, earthfire and studios might be the place to look.
 |
| Original Steampunk Pilot Ring |
The shops designers are Corina St. Martin and Julie Turner. Not only do the girls make beautiful jewelry, but they also do artwork and combines these two crafts in a brilliant way.
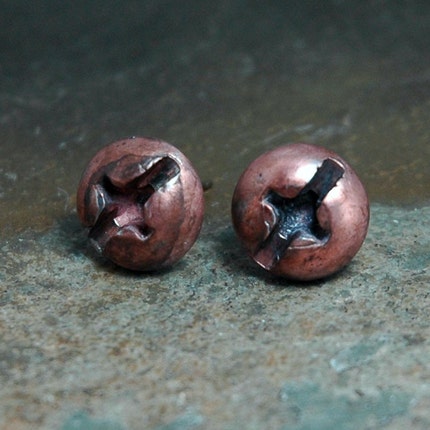 |
| Copper Phillips Head Earrings |
My favourite piece from these girls, are these steampunk earrings. I love the simple and fun design.
søndag den 5. september 2010
Tutorial - Warm/Cool Colours in Jewelry
When we make jewellery, having a good sense of colour is very important. Being the daughter of an artist, I have been taught about the colour circle ever since I was a kid. I’ve adapted the lessons used by painters, to fit our needs as jewellery makers, giving some good points on how to use colours in our jewelry. In this tutorial I will focus on how to use cold/warm colours.
First I need to explain the basics. Through out time there has been many ways of understanding colours, but the most known and used is Newton

The circle is built on 3 primary colours, which cannot be created with any other colours: The primary colours are yellow, blue and red.

The secondary colours are the ones which can be created by mixing the 3 primary colours:
red+yellow = orange,
red+blue = violet,
yellow+blue = green
Finally; the tertiary colours can be created by mixing the secondary colours.
Of cause we can't mix colours when we are using beads, but it is important to understand the basis of the colours in order to understand the difference between warm/cold colours. If you are finding this all confusing try to play with some watercolour, mixing the colours, and seeing the change with your own eyes.

Warm / Cool colours
The colour circle can also be divided into two half’s; a warm and a cold one.
The colours temperature determines how the colours react to each other. In general a hot colour goes with another hot colour and the same with the cold. The colours can be divided into families. All families has both warm and cool variations. This means that an orange colour can actually both be a hot and a cold colour.This is important when choosing colours for different metals.

see if it's a cool or a warm colour.
 Here's when it gets hard, but also important for jewelry making. Metal colours are warm and cool as well. And as we just found out, warm colours goes best with other warm colours, and the same goes for the cool colours.
Silver: Cold colour
Gold/Brass: Hot colour
Bronze/Copper: Hot-cold colour (This means it belongs to the warm family, like gold, but copper has more blue in it, and therefore it is a warm colour going towards the cool colours)
So what on earth does all this mean??
When you are choosing an orange colour for your silver piece, try to keep in mind if the orange is a cold or a hot orange, for a silver piece you should choose an orange that is almost yellow. Copper is a very easy metal to choose colours for, because it’s both a warm and cool colour almost all colours will fit copper.Keep following my blog, to read the next tutorial in this line; Using contrast colours in jewelry
torsdag den 2. september 2010
Inspirational Artist - Gypsy Moon
Shannon from Gypsy Moon Art Studios, is my featured inspirational artist.

Shannon creates beautiful fantasy jewelry, inspired by pirates, dragons, gypsies, and far off lands...
 |
Nereid. Vintage crystal and shell copper necklace |
Why does Gypsy Moon inspire me? - Because she hasn't made one single piece I don't like, or would have changed anything about. I love the mysterious and wondrous mood her pieces put me in and I always drift off, in to my own daydreams watching her lovely pieces. On top of all this, she uses some of the same techniques and materials as I do, and therefore I admire the work and effort that goes into her pieces.
 |
Anne Bonny's Trinkets. Octopus charm necklace |
Shannon mainly work with wire wrapping and cold connections. I see some steampunk inspiration in her pieces, but her style is very unique. I love how she manages to tell a story in all her pieces, something I try to do myself.
 |
| My favourite piece! - Elf Arow |
This piece "Elf Arow" is my favourite piece by Gypsy Moon. The colouring, the wrapping everything just seems to merge perfectly together.
 |
Freya. Sterling Silver Pentacle |
 |
Otherworldly Glow. Brass Eye RingTwo other pieces that I thought needed extra attention; her glass eye ring and pentacle pendant. It's nice to find a kindred spirit, and Shannon most be one, I'm certain.Her lovely creations deserves your attention, so please visit her at gypsymoonart.com |
Abonner på:
Opslag (Atom)